Create a “Faux Neon” Sign using EL Wire — A Great Way to Support Your Team on Game Day

Project Description:
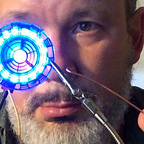
I’m a professor as well as proud alumnus at Boston College, so in preparation for the School’s appearance on ESPN College Gameday, I thought I’d create a “faux neon” team logo sign using electro-luminescent wire. EL wire looks great in the dark, but don’t expect to see the sign in bright light.
Skill Level:
Easy — no soldering or programming needed
Time:
About 2.5 hrs. depending on sign size and design complexity.
Parts List:
Most parts are available from Adafruit, Amazon, or if you’re near Boston College — YouDoIt Electronics in Needham, MA (fun fact for motivating STEMinists — both Adafruit and YouDoIt are run by women).
- Electroluminescent wire
You can find 9ft. for less than $7, including a battery-powered inverter, which can be set to continuous, slow flash, or fast flash light. - A splitter compatible with EL wire plugs
This is useful for connecting multiple wires to a single power source.
You can find a four-pack of 3- or 4-to-one connection splitters for less than $9. - For wall-outlet power, you’ll need a plug-in power supply.
I used a 12v power supply made for EL wire. It includes a 3 switch setting (continuous, slow flash, fast flash), available for less than $23 on Amazon, but you can likely find cheaper options. - For portable operation, you’ll need a battery-powered inverter unless your EL wire comes with an inverter/battery case. Be sure to use an “inverter” battery case designed for EL. EL wire needs AC current (like the kind that comes out of a wall outlet), and an inverter takes the DC (direct current) power produced by the batteries and turns it into AC.
- Black foam-core board
- Painter’s tape
- Fishing line, clear hanging wire, or clear thread to help anchor your EL wire to the foam core board so that it can follow your design outline.
- Electrical tape or hot glue for safely enclosing the end of EL wire after trimming.
- An awl, small screwdriver, or rigid pen for poking wiring holes through the foam-core board.
- Wire cutters or solid scissors for trimming excess EL wire.
Steps:
Find and print a design or logo you’d like to use, or draw one on paper. You’ll use this as a guide for your wiring logo, but you’ll be able to remove the guide once you’re done.
Tape the paper containing your wiring design to the black foam core board using painter’s tape (this is low-stick tape that won’t remove the paper on your foam board when removed)

Poke a starting hole through the foam-core board to begin wiring. Choose a spot near the center of your design since it’s easier to add wires by working outward than it is to wire inside of existing wires. Also plan holes in spots that minimize wiring passed through the back of the foam core board.
Thread the end of the wire (that’s the end without the plug) through the first hole, starting at the back of the foam-core board, poking the wire through to the front. Leave enough slack between the first wire hole and the plug end of the EL wire so that you can connect the EL wires to the splitter, or further adjust the EL wire along your logo, if needed.
Poke holes where the wire will go out through the back of the foam board and continue to weave from behind to front, following your design. EL wire is flexible, but you don’t want to bend it too much, and definitely do not bend EL wire at a sharp angle or else the wire could become damaged. Anything after a wire break won’t light up. If you have a sharp corner in your design, use a hole in the foam core to slide the wire to the back, then create a softer loop on the back and poke the wire out to the front in a way that creates the illusion of a hard corner (see image below).

Poke anchoring holes along your design at points where your wire needs to be anchored to follow your logo. Next, thread your clear tie wire, fishing line, or thread from the back of the foam board, through the hole, around the EL wire, and back down the hole, tying/twisting the tie wire at the back of the foam-core board so that the loop you’ve created holds the EL wire in place.

When you’ve finished with an EL wire color, you can trim any excess EL wire from the end. Just be sure to put electrical tape or hot glue over the exposed end of the cut EL wire to prevent anyone from getting an unintended shock.
When done wiring all of your design’s colors, plug the EL wire into the splitter, then plug the single end coming out of the splitter into your battery inverter or AC power supply.
Add batteries or plug your power supply into a wall outlet and enjoy your new creation!
I teach managers and app developers at Boston College. I’m on Twitter at @gallaugher. Want to learn to build iOS apps? My online offering assumes no prior programming experience, but brings students through eight apps, ending in a “Yelp-style” rating app that use Google SignIn and Google Cloud Firestore. Over 100 videos are perfect for use in a “flipped class” setting, but any student can follow along. The product is only $25, and the first three chapters (two apps) are free. Find the latest version at http://gallaugher.com/swift I also write a managerial textbook in use at over 300 universities. It’s also inexpensive (only $29 for the online version) and can be found at http://gallaugher.com/book